Docker入门
安装
官方仓库安装
shell
# 更新软件包索引并安装软件包以允许使用 基于 HTTPS 的存储库
sudo apt update
sudo apt-get install ca-certificates curl gnupg
# 添加 Docker 的官方 GPG 密钥
sudo install -m 0755 -d /etc/apt/keyrings
curl -fsSL https://download.docker.com/linux/ubuntu/gpg | sudo gpg --dearmor -o /etc/apt/keyrings/docker.gpg
sudo chmod a+r /etc/apt/keyrings/docker.gpg
# 使用以下命令设置存储库
echo \
  "deb [arch="$(dpkg --print-architecture)" signed-by=/etc/apt/keyrings/docker.gpg] https://download.docker.com/linux/ubuntu \
  "$(. /etc/os-release && echo "$VERSION_CODENAME")" stable" | \
  sudo tee /etc/apt/sources.list.d/docker.list > /dev/null

# 安装 Docker 引擎
sudo apt update
sudo apt-get install docker-ce docker-ce-cli containerd.io
阿里云镜像安装
shell
# step 1: 安装必要的一些系统工具
sudo apt-get update
sudo apt-get -y install apt-transport-https ca-certificates curl software-properties-common
# step 2: 安装GPG证书
curl -fsSL https://mirrors.aliyun.com/docker-ce/linux/ubuntu/gpg | sudo apt-key add -
# Step 3: 写入软件源信息
sudo add-apt-repository "deb [arch=amd64] https://mirrors.aliyun.com/docker-ce/linux/ubuntu $(lsb_release -cs) stable"
# Step 4: 更新并安装Docker-CE
sudo apt-get -y update
sudo apt-get -y install docker-ce

# 安装指定版本的Docker-CE:
# Step 1: 查找Docker-CE的版本:
# apt-cache madison docker-ce
#   docker-ce | 17.03.1~ce-0~ubuntu-xenial | https://mirrors.aliyun.com/docker-ce/linux/ubuntu xenial/stable amd64 Packages
#   docker-ce | 17.03.0~ce-0~ubuntu-xenial | https://mirrors.aliyun.com/docker-ce/linux/ubuntu xenial/stable amd64 Packages
# Step 2: 安装指定版本的Docker-CE: (VERSION例如上面的17.03.1~ce-0~ubuntu-xenial)
# sudo apt-get -y install docker-ce=[VERSION]
安装完之后校验:
sh
sudo docker run hello-world看到这样的输出就说明没问题:
sh
Hello from Docker!
This message shows that your installation appears to be working correctly.

To generate this message, Docker took the following steps:
 1. The Docker client contacted the Docker daemon.
 2. The Docker daemon pulled the "hello-world" image from the Docker Hub.
    (amd64)
 3. The Docker daemon created a new container from that image which runs the
    executable that produces the output you are currently reading.
 4. The Docker daemon streamed that output to the Docker client, which sent it
    to your terminal.

To try something more ambitious, you can run an Ubuntu container with:
 $ docker run -it ubuntu bash

Share images, automate workflows, and more with a free Docker ID:
 https://hub.docker.com/

For more examples and ideas, visit:
 https://docs.docker.com/get-started/
基本使用
拉取Python镜像
shell
sudo docker pull python:3.11输出:
shell
3.11: Pulling from library/python
d52e4f012db1: Pull complete
7dd206bea61f: Pull complete
2320f9be4a9c: Pull complete
6e5565e0ba8d: Pull complete
d3797e13cc41: Pull complete
70f90dfe001b: Pull complete
bd75605de417: Pull complete
3d0e1a4b14bc: Pull complete
Digest: sha256:d73088ce13d5a1eec1dd05b47736041ae6921d08d2f240035d99642db98bc8d4
Status: Downloaded newer image for python:3.11
docker.io/library/python:3.11
查看当前所有镜像
shell
sudo docker images输出:
sh
$ sudo docker images
REPOSITORY          TAG                 IMAGE ID            CREATED             SIZE
python              3.11                c0e63845ae98        4 weeks ago         1.01GB
hello-world         latest              9c7a54a9a43c        2 months ago        13.3kB
创建并进入容器
shell
sudo docker run -it --name python311 python:3.11 /bin/bash给容器取个名字:--name python311 ,名字可以自定义;
输出:
sh
sudo docker run -it --name python311 python:3.11 /bin/bash
root@627d0744c2d5:/#
查看下容器的系统环境:
sh
# 查询容器系统的环境
root@627d0744c2d5:/# cat /etc/os-release
PRETTY_NAME="Debian GNU/Linux 12 (bookworm)"
NAME="Debian GNU/Linux"
VERSION_ID="12"
VERSION="12 (bookworm)"
VERSION_CODENAME=bookworm
ID=debian
HOME_URL="https://www.debian.org/"
SUPPORT_URL="https://www.debian.org/support"
BUG_REPORT_URL="https://bugs.debian.org/"

# 查询Python的环境
root@627d0744c2d5:/# python --version
Python 3.11.4
root@627d0744c2d5:/# pip3 list
Package    Version
---------- -------
pip        23.1.2
setuptools 65.5.1
wheel      0.40.0
可以看出来,我们从 Docker 官方拉取的Python镜像是基于 Debian 12 构建的,Python 版本为:3.11.4
这里是进入交互模式,使用 exit 退出之后,容器就停了。
查看当前所有容器
sh
sudo docker ps -a这里主要输出:容器ID、镜像名称、创建时间、状态、容器名称
启动容器
sh
sudo docker start 容器名/容器idsh
$ sudo docker start python311
python311
表示此容器已经启动了,你可以使用 sudo docker ps -a 查看一下“状态”;
进入容器
启动之后才能进入容器;
1、docker attach
sh
sudo docker attach 容器名/容器idsh
$ sudo docker attach python311
root@9b4b3dc24c32:/#
使用 exit 退出容器,容器会停止;
2、docker exec
sh
sudo docker exec -it 容器名/容器id /bin/bashsh
$ sudo docker exec -it python311 /bin/bash
root@9b4b3dc24c32:/#
注意,使用 exit 退出容器,容器不会停止;
删除容器
shell
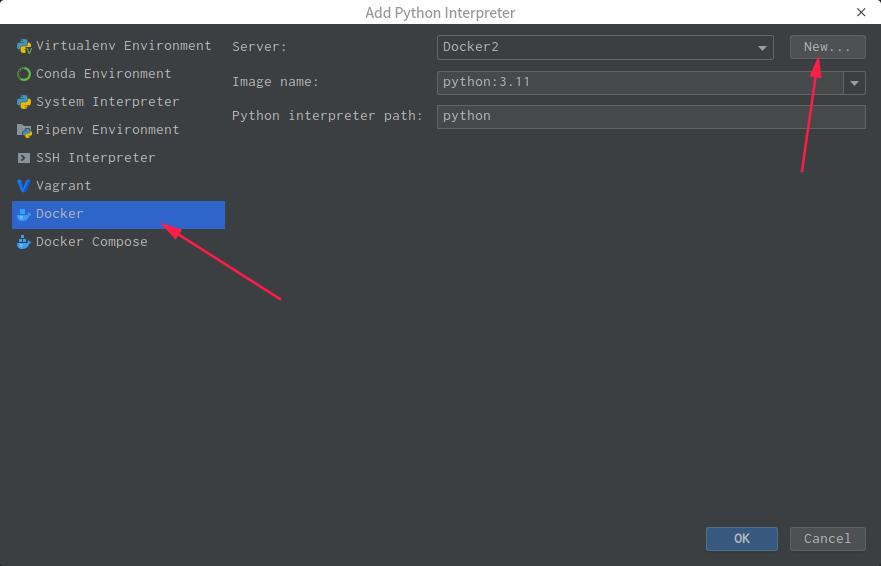
sudo docker rm 容器名/镜像名Pycharm 配置 Docker 容器内 Python 环境
1、ssh 方式指定远程
这种方式需要在容器里面安装 ssh 服务
sh
# 安装sudo
apt-get install sudo
# 启动SSH服务
sudo apt-get install openssh-server
sudo /etc/init.d/ssh start
# 查看SSH服务的状态
sudo service ssh status
# 设置root密码
passwd root
配置文件
sh
vim /etc/ssh/sshd_config增加以下内容:
sh
#启用 RSA 认证
RSAAuthentication yes
#启用公钥私钥配对认证方式
PubkeyAuthentication yes
#公钥文件路径(和上面生成的文件同)
AuthorizedKeysFile .ssh/authorized_keys
#root能使用ssh登录
PermitRootLogin yes
重启SSH
sh
service ssh restart2、TCP 连接
首先,配置文件:
sh
sudo vim /etc/docker/daemon.json写入:
sh
{
  "hosts": ["tcp://0.0.0.0:2375","unix:///var/run/docker.sock"]
}
然后,修改配置文件:
sh
sudo vim /etc/systemd/system/docker.service这到 ExecStart,改成:
sh
[Service]

ExecStart=/usr/bin/dockerd
最后重启服务:
sh
sudo systemctl daemon-reload
sudo systemctl restart docker.service
在 Pycharm 添加解释器界面:
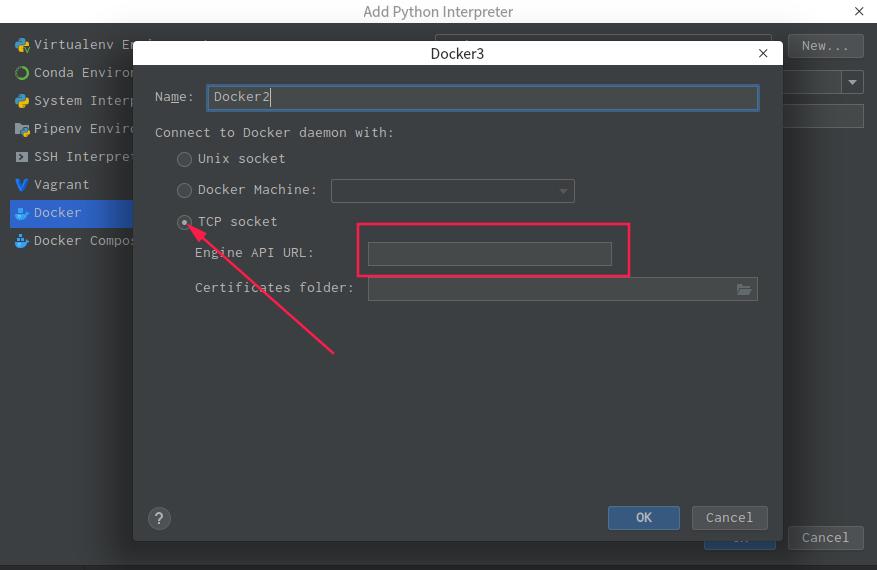
输入:tcp://0.0.0.0:2375
点【OK】就行了。